Dependency Explorer
Added in version 19
The Dependency Explorer is found on the Tools ribbon tab in the Run Mode ribbon group under RAS + CTG Case Info > Dependency Explorer. It can also be opened by clicking the Open Dependency Explorer button on the Options tab of the Contingency Analysis dialog. It can also be found on the local menu of case information displays for objects that can have dependencies.
The intent of the dependency explorer is to enhance the understanding of remedial actions used with contingency analysis. It allows for the viewing and modification of objects that are used in the definition of remedial actions, as well as any conditional contingency actions. Dependencies are objects that are necessary to completely define another object. Some examples of dependencies include:
- Contingencies and Remedial Actions that use Model Criteria have a dependency of either a Model Filter or Model Condition
- Model Filters can have dependencies of Model Conditions and other Model Filters
- Contingency Elements and Remedial Action Elements have dependencies of the objects, i.e. Branch, Generator, Load, etc., to which the action is applied
- Injection Groups have dependencies of the Participation Points that comprise the Injection Group and these in turn have dependencies on the Generators, Loads, Switched Shunts, Buses, and other Injection Groups that belong to them.
The Dependency Explorer is broken into several panes.
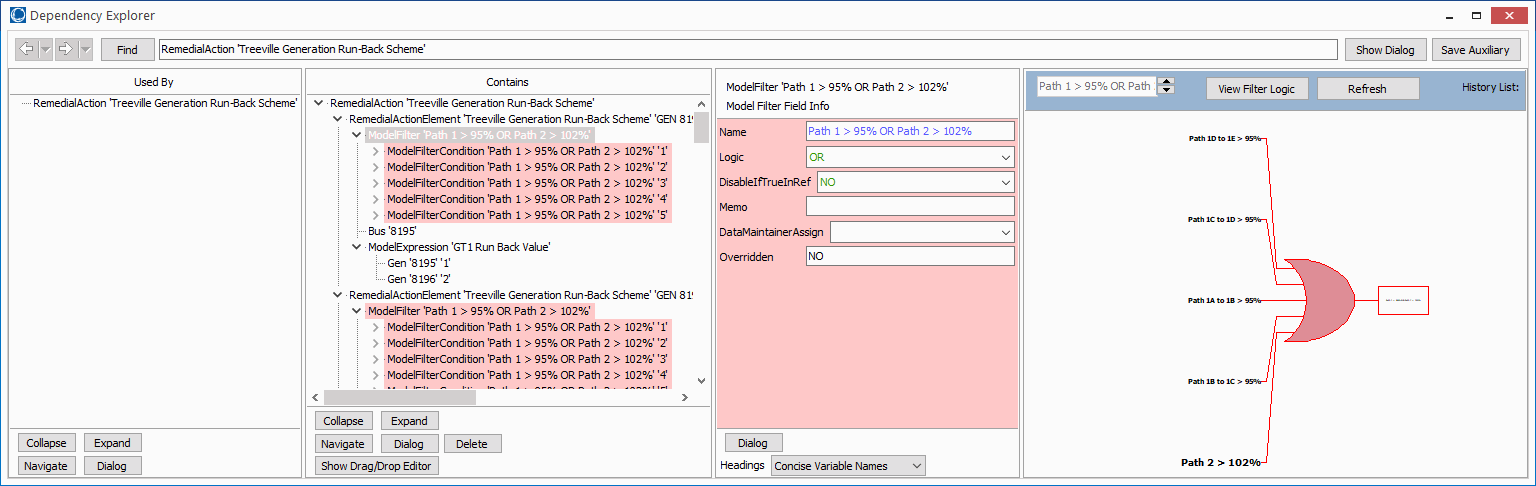
Top Object
The Top Object is the object currently being examined. The Find button will open a dialog for selecting which object to examine. If the dialog has been opened from an object case information display, the top object will be set as that object. The navigation buttons allow scrolling through the history of objects that have been examined.
Clicking the Show Dialog button will open the user interface dialog for the Top Object.
Clicking the Save Auxiliary button will save the Top Object and all of its dependencies to an auxiliary file. The format options that are used in saving the auxiliary file are the same as those required by the WECC RAS format.
Used By
This is a tree view of all of the objects used by the Top Object. The hierarchy of objects is given in the nodes of the tree view. This is most useful with Model Filters and Model Conditions because changing these will impact how a conditional action is applied and the same changes might not carry through to all objects using them.
The maximum depth of any single node is limited to 6. This is to help with the performance of the tree view as expanding and collapsing nodes can become very slow if there are many nodes.
A local menu is available by right-clicking on an object in this tree view. Details of the available local menu options are given in the Local Menu section below.
This pane contains some buttons and color coding that are the same as those used in the Contains pane. These are described in the Common Features on All Panes section below.
Contains
This is a tree view of all of the objects that are dependencies of the Top Object. The hierarchy of objects is given in the nodes of the tree view. As objects are selected in the tree view, the Field Info pane updates with fields for that object.
A local menu is available by right-clicking on an object in this tree view. Details of the available local menu options are given in the Local Menu section below. The maximum depth of any single node is limited to 6 by default. This is to help with the performance of the tree view as expanding and collapsing nodes can become very slow if there are many nodes. This depth can be changed using the Change Maximum Depth option on the local menu.
This pane contains some buttons and color coding that are the same as those used in the Used By pane. These are described in the Common Features on All Panes section below. This pane has two additional buttons:
Delete
Click this button to delete the object that is currently selected in this pane.
Show Drag/Drop Editor
Click this to open the drag/drop editor that allows easy modification of Model Filters by adding or removing other Model Filters and Model Conditions.
To add a Model Filter or Model Condition to another Model Filter, select the Model Filter or Model Condition in the object selector by left-clicking on it and then drag and drop it on the appropriate Model Filter in the Contains pane.
To remove a Model Filter or Model Condition from either a Model Filter or as part of the Mode Criteria for a Contingency Element or Remedial Action Element, left-click on it in the Contains pane and drag and drop it on the Drag/Drop here to Delete pane of the drag/drop editor.
Field Info
This pane is similar to a case information display for an object except that it shows information only for a single object. The single object for which it shows information is the one that is currently selected in the Contains tree view. Fields that can be modified through a case information display can be modified here. The color scheme that indicates the type of field and whether or not it can be modified is that same as that used for case information displays. The fields that are displayed are those deemed relevant for modeling contingencies and remedial actions. These fields are those that are hardcoded as part of the Complete Case Auxiliary File Export Format Description.
The Headings option specifies how the captions are shown for the fields. The following options are available:
Column Headings
This displays the fields using the longer names that are normally used with column headings in case information displays.
Concise Variable Names
This displays the fields using the concise variable names as described in the PowerWorld Object Variables topic.
Legacy Variable Names
This displays the fields using the legacy variable names as described in the PowerWorld Object Variables topic.
Filter Visualization
This pane will appear if a Model Filter is selected in the Contains tree view. This will display the Model Filter Logic Display, which is a graphical representation of the Model Filter logic. Right-clicking on an object in the logic display will open the user interface dialog for that object. Left-clicking on a Model Filter will set that as the new Top Object.
Common Features on All Panes
There are several features and buttons that operate in the same manner regardless of the pane in which they are contained.
Background Highlighting
The following highlighting colors are used to indicate special things about Model Filters and Model Conditions. When showing a Model Filter or Model Condition the background of entries in both the Used By and Contains tree view are highlighted and the background of the Field Info pane is highlighted.
Red
Result of Model Filter or Model Condition is NO.
Green
Result of Model Filter or Model Condition is YES.
Yellow
Model Filter or Model Condition contains unlinked elements.
Blue
Model Filter or Model Condition contains a circular reference.
Collapse Button
Clicking this will collapse all nodes in the tree view on the pane in which the button is clicked.
Expand Button
Clicking this will expand all nodes in the tree view on the pane in which the button is clicked.
Navigate Button
Clicking this will set the object selected in the tree view on the pane in which the button is clicked as the new Top Object.
Dialog Button
Clicking this will open the user interface dialog for the object selected in the tree view on the pane in which the button is clicked.
Local Menu
A local menu can be accessed by right clicking on an object in either the Used By or Contains pane. The following options are available:
Navigate to Object
Selecting this will set the object that was clicked on as the new Top Object.
Show Dialog for Object
Selecting this will open the user interface dialog for the object that was clicked on.
Delete Object
This option is only available on the Contains pane. Selecting this will delete the object that was clicked on.
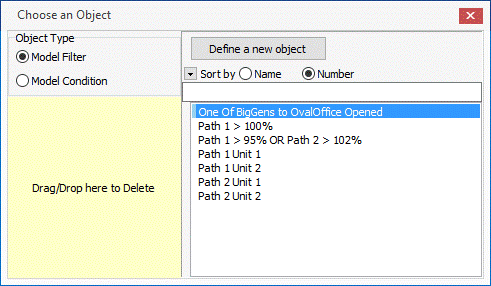
Find New Top Object
Selecting this will open the object chooser dialog that allows selection of a new Top Object.
Show Drag/Drop Editor
This option is only available on the Contains pane. Selecting this will open the drag/drop editor for Model Filters and Model Conditions as described above in the Show Drag/Drop Editor section.
Change Maximum Depth
This option is only available on the Contains pane.
By default the depth of the tree view is set to 6. When this limit is reached no additional detailed information is presented. An entry of "...more..." is given instead. This depth can be increased by using this option. The depth is originally limited because the more entries there are in the tree view the slower the performance may be of expanding and collapsing nodes. It is suggested that the depth only be increased if necessary to see additional details.