Model Expressions can be accessed and created by choosing Case Information and Auxiliary > Model Expressions in the Model Explorer. To open the Define Model Expressions dialog, right-click and choose Insert, when creating a new expression, or Show Dialog to view an existing expression.
The Save, Save As, Rename, and Delete buttons and the drop-down list of expressions at the top of the dialog allow for the additional of new expressions, modification of existing expressions, and removal of existing expressions. There are two types of Model Expressions: an expression and a lookup table.
Lookup Tables
The dialog as configured when creating a lookup table appears as follows:
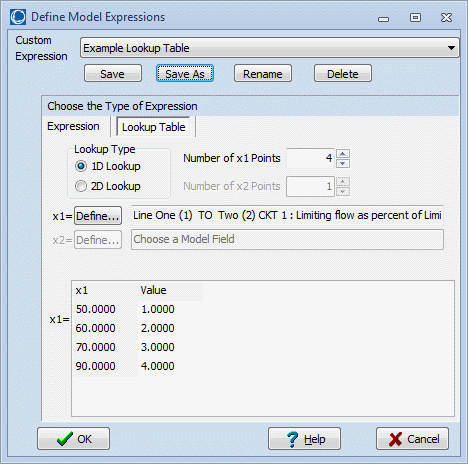
A lookup table may be either one or two-dimensional by specifying the Lookup Type. The Number of Points must be set for each dimension. This will determine the size of the table. A Model Field must also be selected for each dimension. Clicking the Define button next to either the x1 or x2 field opens the Model Field Dialog. This dialog allows the selection of an Element Type and a specific element of this type. The list of elements behaves the same as the Find Dialogs found throughout Simulator. After selecting the element, choose the field associated with this element that will be used in the Lookup Table. Click OK to accept the element and field selected and close the dialog.
Fill in the Lookup Table with the desired values. If selecting a one-dimensional table, there will be two columns, one containing the values for the x1 Model Field and the other containing the Values to return from the Lookup Table when the Model Field is at the defined value. There will be one header row plus as many additional rows as defined in the Number of x1 Points. If selecting a two-dimensional table, there will be one column for the x1 Model Field and as many other columns as selected for the Number of x2 Points. There will be one header row for defining the x2 values plus as many additional rows as defined in the Number of x1 Points. The cells under the first row and to the right of the first column are used for defining the Values to return from the Lookup Table when the Model Fields meet the defined values.
If selecting a one-dimensional table, the returned Value is determined based on the current value of the x1 Model Field. The returned value is the Value corresponding with the x1 value that is less than or equal to the current value of the Model Field. If the current value of the Model Field is less than the smallest value of x1 in the table, then the Value returned corresponds to the smallest x1 value. If selecting a two-dimensional table, the same rules apply except that the Value returned corresponds to the current value of the x1 AND x2 Model Fields and where these intersect in the table.
Expressions
The dialog as configured when creating an expression appears below:
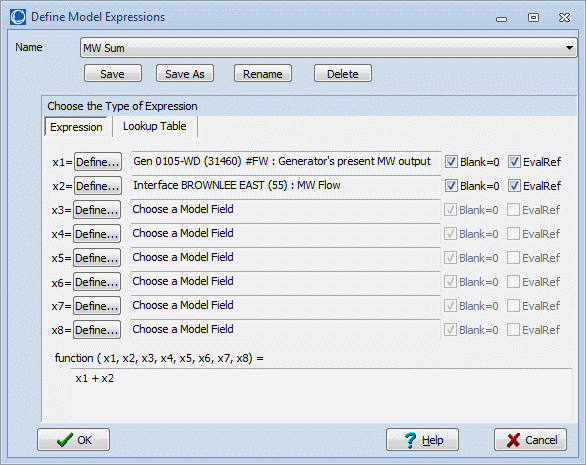
To define the Model Expression as an expression, specify the Model Fields that the expression should be a function of by clicking the Define button next to the appropriate variable. Clicking the Define button opens the Model Field dialog:
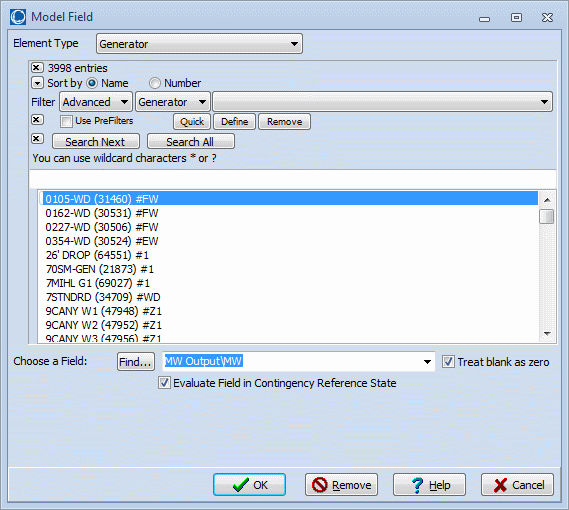
This dialog allows the selection of an Element Type and a specific element of this type, including Model Conditions, Model Filters, and other Model Expressions. The list of elements of a particular type can be searched, filtered, and sorted to make finding an element easier. After selecting the element, choose the field associated with this element that will be used in the expression.
Treat blank as zero check box
The Treat blank as zero check box should be checked if a blank entry for the field should be treated as a zero in the expression rather than treating it as an invalid variable.
Evaluate Field in Contingency Reference State Check Box
Added in Version 19, build on December 18, 2015. The check box Evaluate Field in Contingency Reference State will impact how the Model Expression behaves when evaluated during the contingency analysis solution. This can impact the behavior when the model expression is used as part of a Contingency Element, a ModelConditionCondition, an advanced filter, Custom Monitor, or as part of a Injection Group participation point calculation when evaluated for use during contingency analysis.
Click OK to accept the element and field selected and close the dialog.
After the Model Fields have been defined, enter the function using the variables x1, x2, ..., x8. For example:
x1 * SIN(x2) + EXP(-x5)
or
TAN(x1) + ABS(x6)*8 - 100
For a complete list of functions and operators that are available, see Functions and Operators Available.
After model expressions have been defined, new options will appear on the Contingency Element Dialog and on the Advanced Filter Dialog.
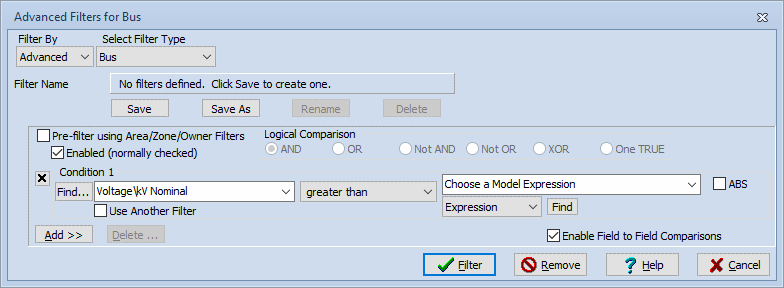
Normally, you may only enter a constant for the comparison value on the Advanced Filter Dialog. However, if you select Enable Field to Field Comparisons, the advanced filter dialog will feature a drop-down from which you can choose Expression. After choosing Expression, you may select the name of the model expression, or click the Find button to search for the name.
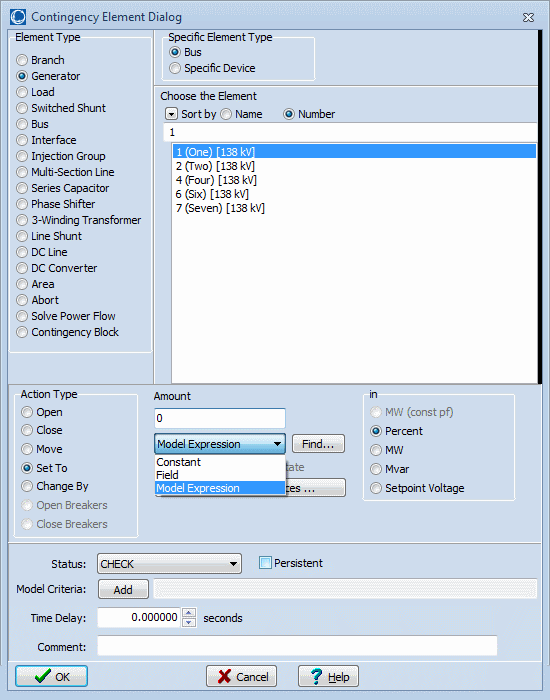
Similarly, normally you may only enter a Constant or a Field for the Move, Set To, or Change By Action Types on the Contingency Element Dialog. However, now you will have the option to choose Model Expression. To change the type of the Amount, choose Model Expression from the second drop-down box. After doing this, enter or choose the name of the model expression in the first Amount drop-down box, or click on the Find… button to search for a name.
Once a Model Expression has been saved, it may be referenced directly in a Case Information Display or AUX file using special notation.
See the Relationship Between Contingencies, Model Conditions, Model Filters, and Model Expressions topic for more information about how these work together.
Model Result Override Added in Version 20
Model Result Overrides can override the result of a Model Expression. If a model expression is being overridden, all of its logic is ignored and the result comes directly from what is specified with the Model Result Override. If a model expression is being overridden by a model result override that is enabled, portions of the dialog will be highlighted in yellow and the message Model Expression is overridden by a Model Result Override will appear on the dialog. The model expression can still be modified while it is being overridden.